Choosing the best siding brake for your business is not simply a matter of buying the most expensive model. The right siding brake should match your daily workload, crew size, material preferences, and transportation needs. A residential installer working from a pickup truck may value portability. A high-volume contractor may need a longer bending capacity, faster setup, and stronger clamping pressure.
Todd Derrick, a siding-tool specialist and contractor trainer, offers a practical reminder: “A brake earns its place when it saves time without sacrificing accuracy.” That principle matters on a real jobsite. Imagine cutting aluminum trim beside a windy driveway, with only a folding table for support. A brake that shifts, pinches unevenly, or requires repeated adjustments can turn a simple bend into wasted labor.
Look closely at construction quality. Check the frame, hinges, handles, locks, and bending radius. Ask whether replacement parts are available. Consider how easily one person can carry and set up the machine. Small details matter.
They add up quickly.
You should also compare warranty terms, operator training, and feedback from contractors using similar materials. Online ratings can help, but they may hide important context. A brake praised by a small repair crew may not suit a commercial siding company. I have seen buyers focus on capacity while overlooking setup time. That is an easy mistake to make.
This guide examines the essential features, practical trade-offs, and common buying errors. It also encourages a realistic question: will this siding brake improve your work every day, or only look impressive in a catalog?
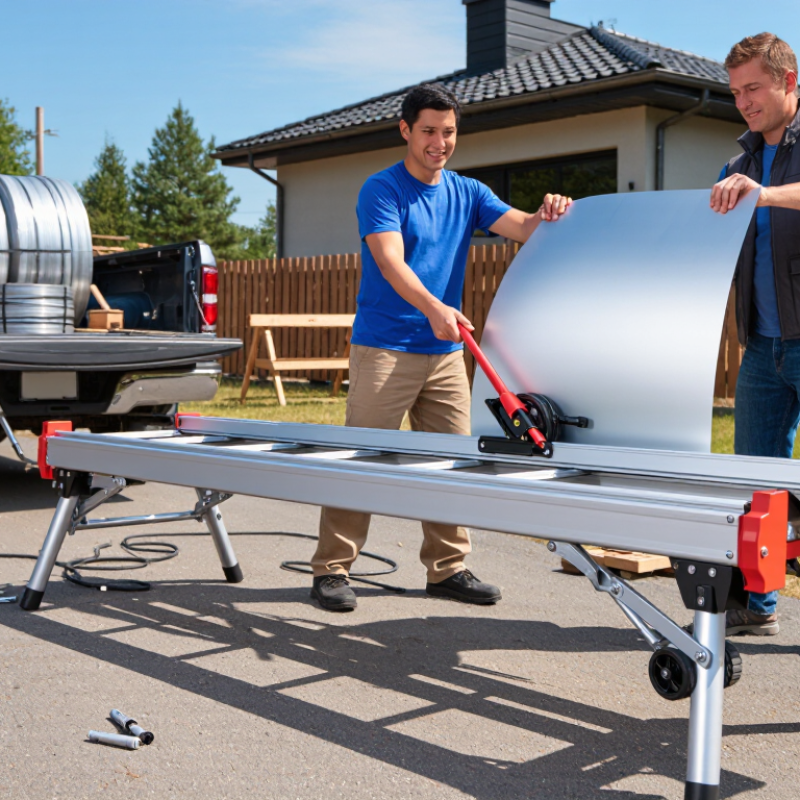
A siding brake is a portable metal-forming tool for shaping aluminum or galvanized steel coil stock. It clamps the sheet and creates controlled bends with a folding handle. Installers use it for window flashing, fascia covers, drip edges, and custom trim. The process is simple: measure, cut, lock, then fold along a marked line. Small adjustments matter. A one-millimeter error can leave a visible gap.
Brake capacity depends on the material’s width, thickness, and coating. A longer model supports wide fascia pieces, while a compact model suits ladders and smaller job sites. Check the manufacturer’s stated gauge range, clamping pressure, hinge alignment, and transport weight. Industry training guidance from the Metal Construction Association emphasizes accurate measuring and compatible forming practices for coated metal panels. Those details protect finish quality. They also reduce wasted coil stock.
Safety deserves equal attention. The U.S. Bureau of Labor Statistics recorded 1,075 construction fatalities in 2023, showing why stable work methods remain essential. A brake should sit on firm supports, with clear space around the folding handle. Gloves help, but they do not replace careful hand placement. In real work, speed can tempt installers to skip a measurement. I have seen that mistake become an expensive replacement. A brake cannot correct poor layout. It only repeats it accurately.
Choosing a siding brake starts with your daily workload, not the tool’s appearance. A residential installer may need a compact brake for short runs and frequent transport. A commercial crew may require a wider model with higher bending capacity. Measure your usual panel length before comparing features.
Look for a rigid frame, smooth hinges, and clear angle markings. These details improve repeatability on fascia, soffit, and trim work. A folding apron can save valuable space inside a service vehicle. Replaceable wear parts also reduce downtime when the brake faces constant use. Check the clamping pressure carefully. Weak pressure can leave uneven folds and damaged edges.
Portability matters on real jobs. Can one worker carry it safely? Does it fit through a narrow gate? Test the handle position and locking points before purchase. A few minutes of hands-on testing can reveal awkward controls. I once focused too much on bending width and overlooked setup time. That mistake affected the whole crew’s pace. It still influences how I evaluate equipment today. Choose adjustable stops if your projects involve repeated measurements. They help maintain consistent returns across multiple pieces. Keep the operating instructions accessible, and train every user on pinch points and proper material placement. Small features often decide whether a siding brake supports your workflow or slows it down.
Choosing a siding brake starts with the work your crew performs most often. A portable manual brake suits contractors who move between repair sites and new builds. It folds into a vehicle and handles common trim work without requiring power. A bench-mounted brake offers greater stability for repeated shop production. Powered models can improve speed, but they also require more maintenance and operator training. Faster is not always better.
Compare working width carefully. A narrow brake may manage window flashing, while wider equipment handles long fascia and roof-edge pieces. Check the maximum material thickness, bend depth, and adjustment range. These measurements matter more than the advertised overall length. Leave room for the material to rotate without hitting walls, ladders, or nearby tools. Measure your actual truck space too.
Material choice affects weight, stiffness, and service life. Aluminum frames are easier to carry, yet some lighter designs can flex during sharp bends. Steel components usually provide stronger support but add considerable weight. Examine hinges, levers, locking points, and replaceable wear parts. I once focused too much on low weight and underestimated setup movement. Test a sample cut before purchasing. Watch the bend line, listen for loose hardware, and record the result. A brake that feels perfect on day one may expose weaknesses after several busy weeks.
A siding brake earns its place on a busy job site when it keeps operators safe without slowing the work. Check that the frame stays stable while bending full-length panels, and look for guards or pinch-point controls near moving parts. Handles should be reachable without leaning across the machine. Try the brake with gloves on; a control that feels obvious barehanded may be awkward in cold weather. Small details matter.
Durability shows up in hinges, clamps, and adjustment points, not just in a heavy frame. Inspect welds and moving joints, then ask how often routine lubrication or alignment checks are needed. A brake that travels between jobs should have secure locking points and wheels suited to uneven ground. Weight is a trade-off: a sturdier machine can feel more stable, but one person may struggle to load it safely. That is easy to underestimate.
Ease of use is best judged with the materials and bends your crew handles each week. Test how quickly the clamp holds metal evenly, and whether the bend angle is easy to repeat. Watch for slipping, uneven pressure, or adjustments that require tools. Ask an experienced operator to run the test, too; my own first impression is not always the crew’s. A short trial can reveal friction that a specification sheet cannot.
How to Choose the Best Siding Brake for Your Business?
Selecting a siding brake starts with the work you actually handle. Measure your longest common trim pieces, then compare them with the brake’s bending capacity. Check the material thickness range, clamping pressure, and adjustment controls. A brake that handles heavier stock may be useful, but extra capacity can add weight and cost. Keep it practical. If your crew moves between job sites, consider the brake’s folded size, carry handles, and setup time. Ask a supplier for a live demonstration, and test a sample piece of your usual material. Small bends reveal a lot.
Tips: Before purchasing, write down your typical panel lengths, metal thicknesses, and daily job volume. Inspect hinges, clamp edges, and moving parts for smooth action. Ask about replacement parts and service support. These details are easy to overlook.
After purchase, place the brake on a stable, level surface and follow the manufacturer’s setup instructions. Keep the bending edge clean; metal shavings can mark finished stock or interfere with clamping. Check fasteners and alignment regularly, especially after transport. Store the brake dry and protected from impacts. A quick inspection before each job can prevent uneven bends and wasted material. I’ve seen a good tool produce poor work simply because its setup was rushed. That part is easy to forget.
| Decision Area | Options or Typical Considerations | How to Choose | What to Verify Before Buying |
|---|---|---|---|
| Brake style | Portable manual brake; powered or automated bending equipment | A manual brake may suit mobile crews and varied job sites. Powered equipment can be worth evaluating for frequent, repetitive production work. | Setup time, power requirements, portability, operator training, and the manufacturer’s rated material capacity. |
| Working length | Common portable brake lengths include approximately 10, 12, and 14 feet; availability varies. | Match the usable bending length to the longest profiles your crew regularly forms, while considering transport and storage limits. | Usable capacity, overall machine length, vehicle or trailer fit, and whether extensions are supported. |
| Material and thickness | Capacity depends on material type, thickness, bend profile, and brake design. Aluminum and steel ratings are not interchangeable. | Select a brake rated for the materials and thicknesses you actually use, including the heaviest routine work. | Written capacity specifications for each material, plus any limits on narrow bends, hems, or complex profiles. |
| Portability and setup | Consider machine weight, carrying points, support legs, transport locks, and setup requirements. | For frequent job-site moves, prioritize safe handling and a setup process the crew can perform consistently. | Loaded transport dimensions, number of people recommended for handling, and compatibility with your truck or trailer. |
| Bend quality and adjustment | Clamping alignment, apron adjustment, and consistent pressure affect bend quality. | Whenever possible, test a sample using your usual material and profile before committing to a purchase. | Even clamping across the working length, repeatable bends, adjustment instructions, and available replacement parts. |
| Purchase cost and support | Compare total cost, including freight, setup, accessories, training, and maintenance parts. | Evaluate cost against expected workload, downtime risk, and the kinds of work the brake enables your team to complete. | Warranty terms, service availability, manuals, parts lead times, and what is included in the quoted price. |
| Routine maintenance | Keep the machine clean; inspect moving parts, fasteners, alignment, and clamping surfaces regularly. | Follow the service schedule and procedures in the equipment manual; maintenance needs vary by design and usage. | Approved lubricants, adjustment procedures, inspection intervals, and any parts requiring periodic replacement. |
| Safe operation | Pinch points, sharp sheet edges, and awkward or heavy material can create handling hazards. | Train operators, use appropriate protective equipment, and follow the machine’s operating instructions and workplace safety procedures. | Safety guidance, guarding or protective features, safe lifting recommendations, and procedures for securing the brake during transport. |
Note: Capacity, available lengths, features, and maintenance requirements differ by model. Confirm all specifications and operating instructions with the equipment documentation before purchase or use.

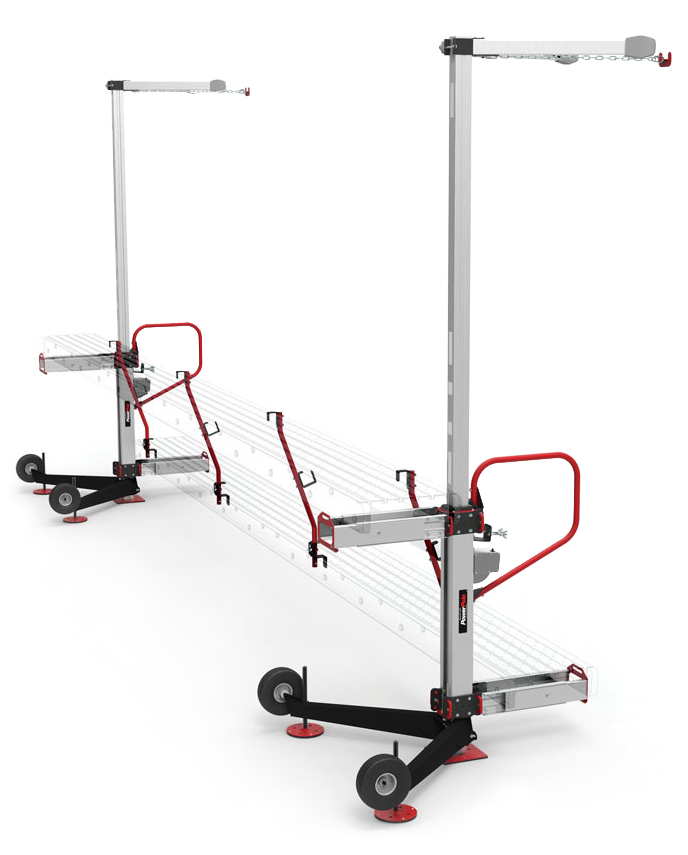
With the ReechCraft PowerPole, traditional scaffolding and pump jack systems are a thing of the past. Our streamlined design gains you access between buildings, on rooftops, around landscaping, and more. The PowerPole is perfect for contract work on residential areas.

Don't miss our WernerCo Sfety and Demo Day BBQ
June 23rd, 2022 from 10am - 2pm
Chance to win giveaways
Cookout from 10am - 2pm
Werner fall protection and Weatherguard Specialists on site to answer any questions and perform safety and product demonstrations.